This week I am going to feature Fall/Grateful Theme projects. I love giving Thanksgiving gifts. A few years ago I started giving gifts to those I was grateful to in different areas of my life. It started with teacher gifts and now is anyone I want to say thank you to. I love giving these because unlike Christmas, people don't really expect them. I still give cards and gifts during Christmas too, but I think giving Thanksgiving gifts and cards is more meaningful and appreciated. So give it a try this year!
The top picture is my first feature. I apologize that the picture is blurry! I thought I would start with an easy gift idea that many of you might already do (minus the tag). This is simply a tag, looped with ribbon to dress up a wine bottle you might give to a hostess. If you already take wine as a gift, dressing it up with a tag makes it even more festive.
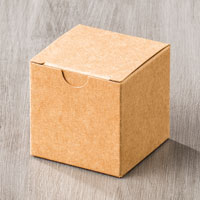
If you haven't noticed, I like boxes/favors, basically any gifty item. Here is a cute little box I made, cased from my downline Alisha using the Tiny Treat Boxes. These are the perfect tiny treat that can fit about 10 hersheys kisses or so. They are super affordable, $6.95 for 25 and come pre-cut and scored. What do you think?! I envision using these for Halloween or Christmas, or Valentines! I know that is thinking really ahead, but wouldn't these be cute!
I had my daughters 8th birthday party this weekend. It was a carnival theme and that meant we had lots of details to do and create. I bought the kids cotton candy pails as take home treats and then realized I wanted to add something else just in case some kids with allergies couldn't have it. LONG story, short....it was the night before and I needed a quick goodie box. So I went to my ALL TIME FAVORITE, LIFESAVING product...Tag A Bag Gift Boxes. I didn't take a picture (darn!) before I gave them out, but they were simple and cute and worked. I wrapped them in yellow and white carnival themed DSP and voila I had treat boxes!
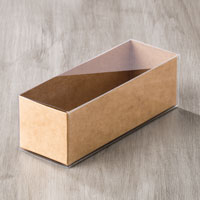
Here is how they come, kraft boxes with acetate sleeves. They are really heavy duty and cheap...for about $1 each in packs of 8.
Here are several projects I have done with them. I love doing treats for teachers, staff, friends, kids, and anyone else I can think of. All you have to do is wrap them with DSP (designer series paper) and some ribbon, add a tag and your set.
The one on the top I made for Back to School treats.
This one my friend Alisha gave me filled with new Blendabilities markers at Convention (she is super sweet!)
This one was for Easter and I filled it with eggs (naturally!), small toys and candy.
These were my Christmas gifts last year for people I wanted to give "a little something" too.
These were my Christmas gifts last year for people I wanted to give "a little something" too.
I called these my "Coffee Break" treat boxes ;)
This one was my very first! I made these last year for my daughters 7th birthday (bike theme).
Can you tell I love these?! Seriously, they are super easy and give a WOW factor! Try them for your next birthday, holiday, baby shower, bridal shower, Christmas, ........you get the idea right!
I was so excited to show you these I also made a video featuring the Halloween Tag A Bag Treat Box shown on the top of this post. I really wanted you to see how cute and easy these were to make. Please watch and enjoy!
Here is a link to these lifesavers or order directly with me!
Don't you love crafty gifts?! I do! My friend and downline member Alisha is one of the most thoughtful people I know. She always makes me cute gifts. She is so creative, I just love everything she makes. This is a gift she brought a couple weeks ago. Inside the little kraft box is one of Stampin' Up!'s cookie stamps! I can't wait to make some cookies with it (another post will follow with this!).
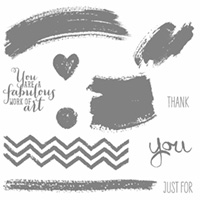
I hope this gift box inspires you to make something for someone. It is made with SU's Extra Large Gift Boxes, some designer series paper, ribbon and the Work of Art stamp set.
Here are some of the products used in this project:
Here is a quick and cute favor I made this weekend. I was in need of adding a little treat to my Teacher Appreciation bags, wanted to make it simple and came up with this. I think it is a great way to do an easy, but still cute favor. Or, a good favor to make when you have little time or need to mass produce. I also made some of these for a baby shower a couple weeks ago, too!
We love our teachers! I truly appreciate the work they do and the dedication they put into our kids. Here is my part 1 appreciation for our teachers this year. I like to give something handmade first, because that is what I love to do....then later in the week I'll give something else (not handmade!) lol In past years I made things with a teaching theme. This year, I loved this flower and colors that I chose a summer/springy theme instead.
This kit includes a notepad, card set, and a lollipop favor all wrapped up in cello bags.
Come back tomorrow for a 2 minute video I pre-posted on how to make the Quick and Easy Lollipop favor.
Today I participated in a Fall Vendor Sale. As you can see from the above table, I took lots of stuff! My table had no room on it when I was done setting up! lol Overall, it was a good event. I focused my handmade items on small gifts, cards and card sets. The things that sold best were the gift items. I think we are all looking for small gifts this time of year for neighbors, coworkers and other people we want to give a "little something" to. I do have some left over, so please contact me if you would like to order any. I will gladly calculate shipping and try to be efficient (and as cheap as possible) with shipping.
Here are a few of the items that I took.
Mini Coffee Cups (filled with Hersheys kisses): $2.50 each ...super cute for coffee lovers or any other adults!
Coffee Break Gift Set: $6.00.
This cute box is a Tag A Box from Stampin' Up!. It is decorated with Stampin' Up! DSP, washi tape and ribbon and filled with 2 Krueig pods, 4 coffee cookies, and choclates.
Post It Holders with Pens: $5 (my best seller today!)
Notebooks with Pens :$4. Both of these are good teacher gifts or coworker gifts.
Big Bow Gift Card Holder: $3
Smore Kits: $2.50. This one got a lot of attention too. I think everyone love a good smore!
Contact me to order any of these items or to learn how to make your own!
I saw a project on Becky Roberts blog that I fell in love with....Mini Coffee Cups dazzled with Stampin' Up! designer series paper (DSP) and stamps! She stated she got the idea from Deb Valder's blog. So right away I searched for the mini cups, found some inexpensive 100 packs on Amazon and could not wait to create! I filled these with a few choclates covered in matching DSP, added a little raffia and viola!- a cute little favor or gift.
What do you think?! Measurements can be found on the link above...although I cut her template a little bigger to give the cup better coverage.
When I seen the Thankful Tablescape Simply Created Kit I pictured my home beautifully decorated for Thanksgiving using the contents of the kit. I was eager to get a kit and make some samples. I LOVE the White Stampin' Chalk Marker (132133/$3.50)! It really does look like I used chalk! The kit itself was filled with tons of goodies that are really easy to use. So, above are some items I made for my "table". I added the Harvest of Thanks stamp to my centerpiece candle just to add a little something extra.
At Convention, Sara Douglas (Shelli's daughter) demonstrated another use for this kit....a Thankful Journal! I was in awe over how cute the journal was. Again, I couldn't wait to make it. Here is my take on it...using items from the kit and a little bit of Sweater Weather DSP:
The kit comes with a piece of chipboard, so you just cut that in half and that is your cover and back pieces! Here are a few pages from the inside:
I can't wait to add pictures to the basic black spaces in the top two pages! She had the cutest pictures of her kids in their trampoline with beautiful fall colored trees in the background. They were stunning!
SOOOO, did I convince you that you just HAVE to have this kit?! hehehe
Here is the link to order and a photo of what it comes with. This is the bundle version that includes the stamp (133341/ $23.95)
Happy Back to School!
Well all good things have to come to an end! My girls had a blast this summer but there summer is coming to an end. To kick of the year on a good note ;) , I made some chocolate favors to give to their teachers, old teachers, and other staff. I used It's a Wrap Occasions stamp set.
Happy Stampin'
Mayra
(PS. It's retired ribbon, but I love it and couldn't help using it!)
I think these are my ultimate favorite goodie boxes so far and easy and the most bang for my buck!
They are the Tag a Bag Gift Boxes (130927/ $6.95 for 8.....that comes out to about $1 each with tax and shipping in my area). Okay to the details.
Here is what the boxes look like plain:
They are a thick cardboard material with clear acetate sleeve. To dress them up I took a piece of cardstock and cut and scored it to fit inside (to match the invitation of course!). Then I added DSP and punched out labels to give them a personal touch. I also added a dash of matching ribbons ;) They were easy to make and I think everyone loved them! As for the inside, we had a candy buffet table so everyone got to stuff it with candy.
Here are the measurements:
Cardstock insert: 7 x 4 3/8 (score at 1 and 3 3/8 on short side)
Cardstock Layer: 6 7/8 x 2 1/2/
DSP layer: 6 5/8 x 2
Other tools used: 1 3/8 circle punch and scallop circle punch, SU ribbon
Well, I'm not sure if I have been on track with the days, but I hope you have enjoyed seeing WAY more projects than I normally post. I have!
I CASED this from several people, I can't remember who the original person was or if I even seen the original one....but I loved it! It's a card and a holder. On the outside it looks like a coffee cup and on the inside you can add a little coffee treat (I added Starbucks Vias) or a gift card! If you have coffee lovers in your life I think this one is great.
Here is an easy gift project you can make quickly and in large amounts. It's called a sour cream container (I think!). I used a 4.5x6 piece of DSP, put sticky strip to make a cylindar in the long side. Then, I pinched the top, added a strip of sticky tape to close it. Then pinched the opposite angle on the bottom and closed it with sticky strip. I am not sure if that makes sense, but try it with scratch paper and you'll see it's easy. Tip: make sure you use sticky tape and not snail. Snail is not strong enough for rounded or 3-d projects.
The inside is filled with 8 hershey kisses. I think I am going to take my leftover DSP from the Festival of Prints paper stack and make a bunch of these for coworkers and school staff. The stamps are from the hostess set Mixed Medley, but you can substitute it with any festive stamp.
Well, when they say the student surpases the master (or some saying like that!), they are right! When I first joined Stampin' Up! I was going to be strictly a hobby demonstrator (just using the discount, nothing business). Then I decided to do a "couple" things, then I started my first stamp club....and that's when I was hooked!
One of my first Stamp Club members was Myong. I knew her from my local MOMS club and invited her to join. She had never stamped, scrapbooked, or done anything crafty- according to her ;) Ha!...she could have fooled me! She instantly loved stampin and continued with my club for 4 years, until she joined Stampin' Up! and my downline team.
As my downline member, I invite her to come to my club nights to join in on the fun, get ideas, and to chat. She always bring projects to share and every time we are all "oohhing and ahhing" over her creations. I asked her for permission to post a few and she agreed. I love her elegant style and how she puts so much beautiful detail in her projects.
A few notes on the projects:
Above card: This one uses Comfort Cafe DSP, Papillion Potpourri, and Elements of Style stamp sets.
Card below: This card features the Postage Due stamp set.
Owl: This is an adorable treat box made with lots of circle punches, oval punches, a heart punch and the Top Note Big Shot die. Isn't it cute!!
Thank you so much Myong for letting me share your awesome projects!
Easter is around the corner! I had been eyeing this Mini Milk Carton Die for a long time and finally decided to get it to make Easter goodies. Here is my first one. Let me know what you think!
Recipe Stamps: Retired ;( Ink: Melon Mambo Paper: Daffodil Delight, Simply
Scrappin’ Spring Fever DSP, Whisper White, Melon Mambo Accessories: Glimmer brad,
Scallop Square punch, Beautiful Wings embosslit, Rhinestone, Mini Milk Carton
Die
My baby turned 5 yesterday and we had a special Carnival party for her. Lucky for me she picked a Carnival theme right before the release of the new catalog so when we seen the Big Top Suite (pg. 62) in the new book we knew it would be perfect for her party. She loved it!
So I used the Big Top Birthday designer series paper for a lot of the items I made and used those colors throughout the party. To create the goody bags and inside of the invitation I purchased the Big Top Embellisments on My Digital Studio and easily made goodie bags, signs for the games, and other accents.
These were the centerpieces. The "vase" was made using the 2-4-6-8 box measurements and cut at 7".
These were the goody bags designed and made with My Digital Studio. I printed at home so the best paper I found for these bright colors was glossy photo paper.
This was our cupcake holder. It is a little lopsided but I just wanted to show you how I used the same DSP to dress it up from the plain white that it came in.
We created games and made signs for all of them using My Digital Studio:
Lastly, I dressed up the water bottles with DSP too. No picture ;(.
It was a lot making all of these projects and being able to match everything perfectly with the SU products. My daughter had a lot of fun and loved all her goodies.
For information on purchasing these Carnival Party items, email me at mayramt@hotmail.com.